Configuring Arduino and bluetooth module
Develop Android applications that connect to devices based on Arduino
Develop Android applications that connect to devices based on Arduino

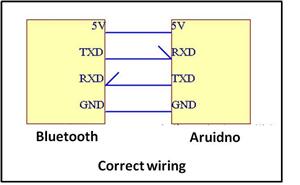
The connection pins RX, TX, GND and Vcc should follow the scheme:
After this stage it is already possible to send and receive data from an android device.
The data transfer should be treated as a Serial communication, example:
void setup(){
Serial.begin(9600);
Serial.write("Hello Android");
}
void loop(){
if(Serial.available()>0){
char c = Serial.read();
}
}
With the wires connected correctly there is the possibility to change the settings of the bluetooth module. The component we set was a JY-MCU, so it is not guaranteed that the table below work for other models.
Command
|
Description
|
Options
|
Response
|
|---|---|---|---|
AT+VERSION
|
Returns the software version of the module
|
OKlinvorV1.x
| |
AT+BAUDx
|
Sets the baud rate of the module
The command AT+BAUD8 sets the baud rate to 115200 |
1 >> 1200
2 >> 2400 3 >> 4800 4 >> 9600 (Default) 5 >> 19200 6 >> 38400 7 >> 57600 8 >> 115200 9 >> 230400 |
OK115200
|
AT+NAMEOpenPilot
|
Sets the name of the module
|
Any name can be specified up to 20 characters
|
OKsetname
|
AT+PINxxxx
|
Sets the pairing password of the device
|
Any 4 digit number can be used, the default
pincode is 1234 |
OKsetPIN
|
AT+PN
|
Sets the parity of the module
|
AT+PN >> No parity check
|
OK None
|
A good way to test if the connection is working perfectly connect the Arduino is either an android phone (via bluetooth), and via USB to a computer.
Using the library SoftwareSerial You can simulate a serial port using two pwm digital pins.
The Basic example of using SoftwareSerial can be used for this purpose, connecting the TX pin of the BT module Arduino pin 10 and the pin RX module to the microcontroller 11. Thus all the data that the arduino receive via bluetooth will be echoed in serialmonitor.